Google Analytics 4 introduced a new take on the go-to analytics platform for many marketers. Reimagined from the ground up, with a new interface and tweaked primary metrics, GA4 also requires a different setup process to get tracking tags in place.
Google Tag Manager (GTM) provides an easy, templated route to install GA4 on your site as well as create custom events. In this article, I’ll walk through getting GA4 tracking in place via GTM, as well as cover some basic customization options.
How to set up the main GA4 code
The gtag.js tag is the basic tracking code you need to place on your site. Once you fire this for all pages, you’ll start recording all the default data that GA4 tracks for website visitors.
GTM makes setting up this tag as simple as a few clicks and pasting in an account ID.
Note: If you already have a Universal Analytics tag (analytics.js) firing on your site, you should leave it in place! You can run GA4 alongside Universal Analytics, and you should keep any former Universal Analytics properties active to preserve historical data. GA4 will only record data moving forward from the point in time when you set it up.
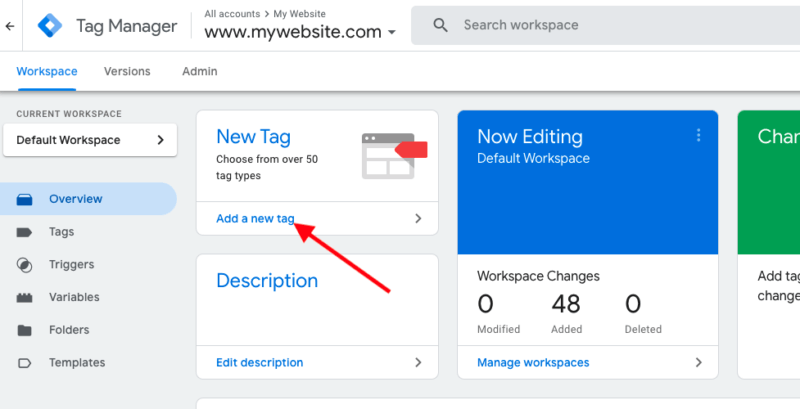
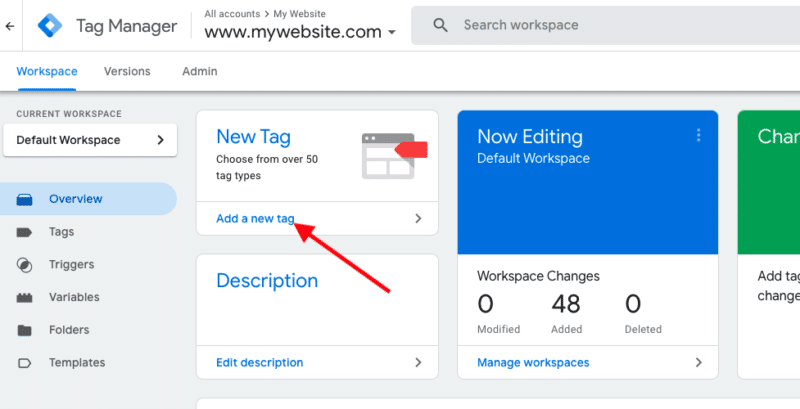
Step 1: To start setting up your GA4 tag, navigate to your desired account and container within GTM and select “Add a new tag.”
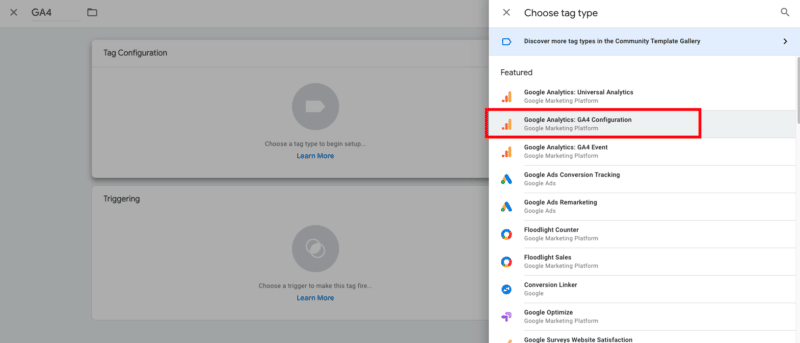
Step 2: Now, click within “Tag Configuration” to see the options for various types of tags. Select Google Analytics: GA4 Configuration.
Step 3: You’ll see a field to enter your Measurement ID. Find your Measurement ID in your account, and paste it here.
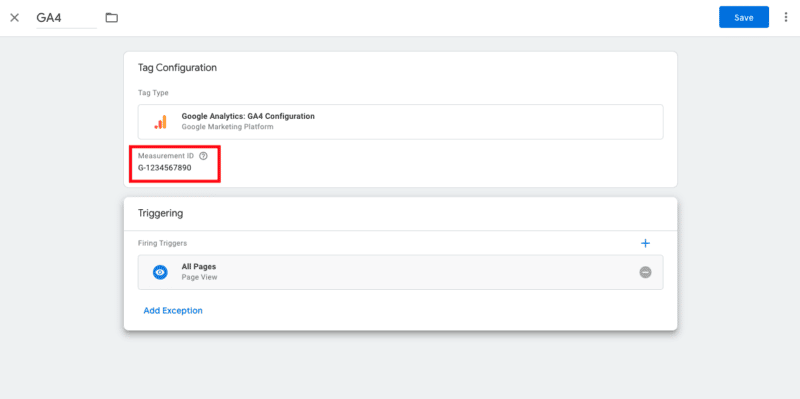
Step 4: Click within the “Triggering” box to choose where you want the tag to fire on your site. In most cases, you’ll likely want GA4 to fire on all pages. However, depending on your setup, you may want to exclude certain pages, such as private login sections.
Step 5: Save your tag, and publish your GTM container to push it live. You should now see GA4 firing on your site. To double-check that you’re actually tracking sessions, check the Realtime section of Google Analytics. You should see your own visit reflected here soon after hitting the site.
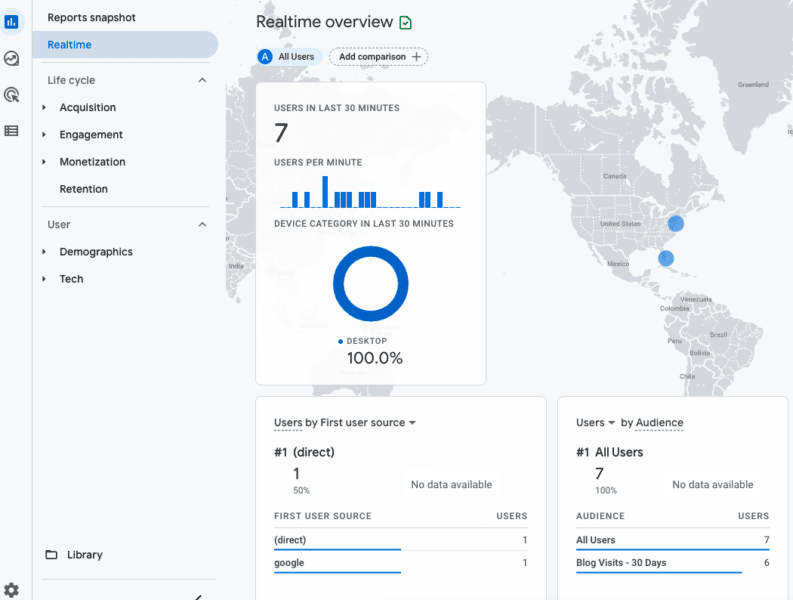
Now that you have the basic gtag.js tag in place, you can then move to set up some additional customization, such as adding events.
Setting up event tracking for GA4 in Google Tag Manager
One of the major improvements that came with GA4 was built-in event tracking. Directly within the Google Analytics interface, you can enable Enhanced Measurement to fire events for actions that previously required manually created events, such as scroll activity, outbound clicks, file downloads, and video views.

However, note that there are still limitations to these events compared to more advanced tracking options you can set up through GTM. For instance, the now-built-in scroll tracking option simply triggers a “scroll” event once the user reaches the bottom of the page (measured at the 90% point). By default, you won’t be able to track when the user starts to scroll to earlier points of the page.
The beauty of GTM lies in the ability to easily fire events for a vast array of actions that users could take on the site. We’ll use scroll tracking as an example event setup here, but note that you can use the GA4 Event tag to create events for any triggers that are available in GTM.
Step 1: To start, create a new tag with a Tag Type of “Google Analytics: GA4 Event.” Choose your GA4 ID under “Configuration Tag.”
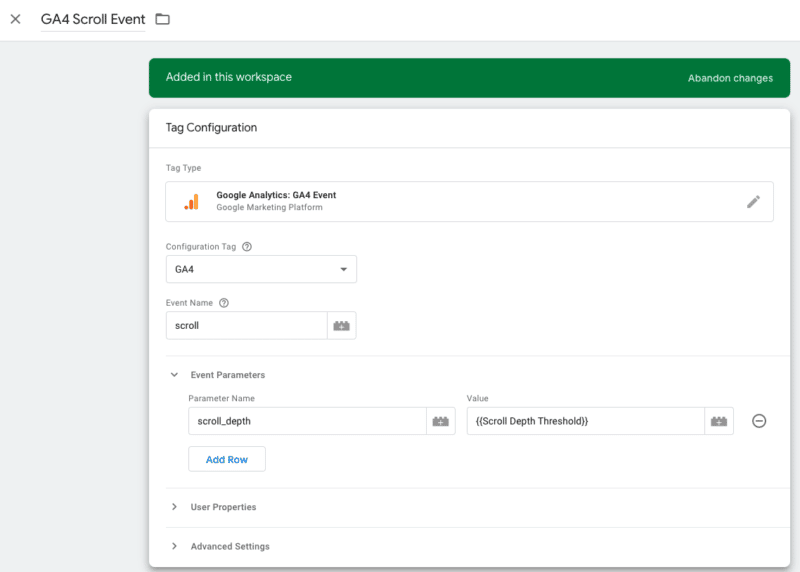
Step 2: Next, enter the Event Name that you’d like to appear within the Google Analytics interface. In this case, we’re using “scroll” to align with the existing “scroll” event that GA4 tracks.
Step 3: Click on the Event Parameters section to expand it. Here, we can add a custom parameter to send further details about the event to Google Analytics. In this case, we’ll send through percentage values for when people scroll to specific points on a page.
Step 4: We’ll use “scroll_depth” for the Parameter Name. Next, the value will be {{Scroll Depth Threshold}}, a variable within GTM that will pull in the scroll percentages as people interact with the page and data is sent back in.
Step 5: We’ll need to create a trigger to determine the values we want to track. Click in the bottom Triggers section to start a new trigger, and select Scroll Depth Trigger.
You can then choose vertical or horizontal scroll depth and select between tracking based on percentages or pixel depth. With the variety of screen sizes people may be browsing from, the percentage option is likely your best bet here. Add the numbers for the scroll points you want to track, separated by commas.
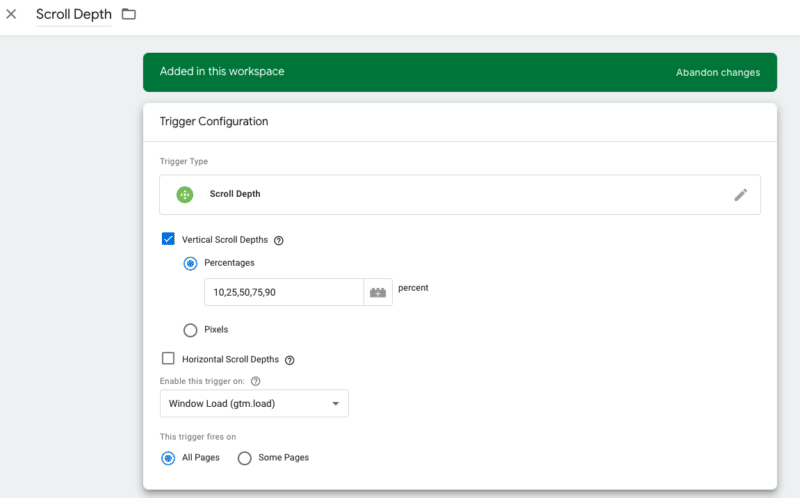
Step 6: Finally, save the trigger, save your tag, and publish it live. You should now see more detailed scroll data populate when you look at the Events section in Analytics.
You can use the same basic model presented above to fire additional events into Google Analytics. Use the event name that you’d like to populate into Google Analytics, and use parameters to populate additional details.
Setting up GA4 and GTM is easier than you think
If you haven’t yet set up a GA4 property for your site, you should get one in place sooner than later to begin accruing data. GTM helps to make the setup process more seamless for marketers. Go ahead and create your GA4 property, add the tag via GTM, and start experimenting with event setup!
The post How to set up Google Analytics 4 using Google Tag Manager appeared first on Search Engine Land.
Source: IAB

